官方wiki
https://nezha.wiki/guide/agent.html
GitHub
https://github.com/nezhahq/agent
支持平台

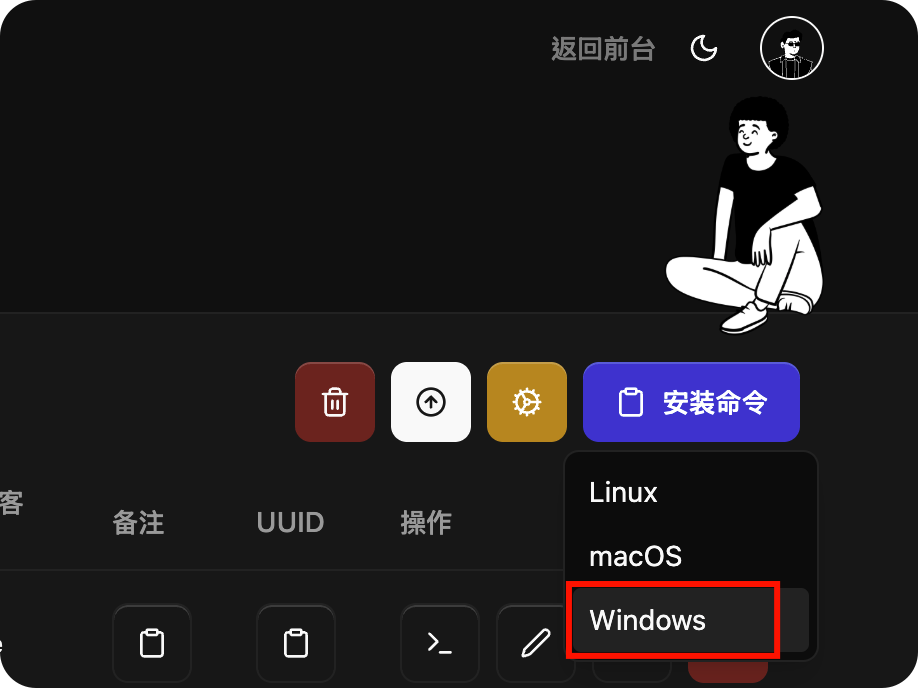
Windows部署
一键部署
登录后台,设置好相关参数(Agent对接地址【域名/IP:端口】),可以直接生成的安装连接
在Windows PowerShell中用Admin权限运行

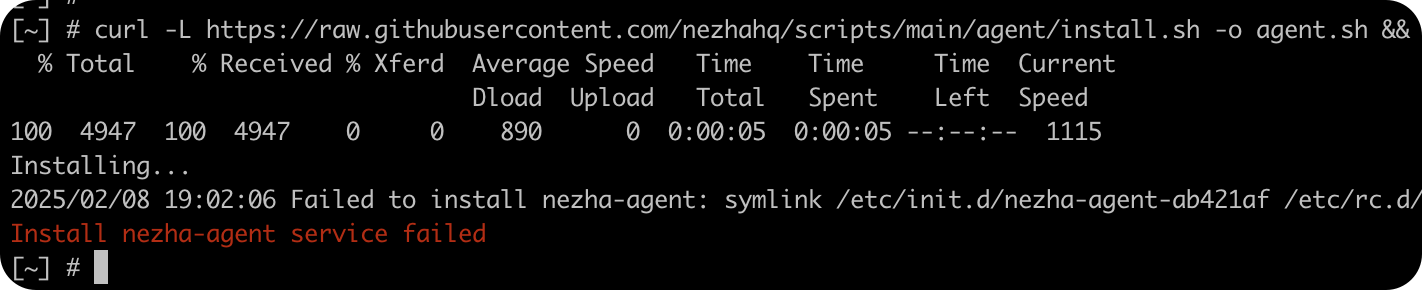
由于要通过github安装,可能会安装失败,此时建议通过手动安装
手动安装
参考官方文档
添加为Services自动启动
PS C:\nezha> New-Service -Name "nezha-service" -BinaryPathName "C:\nezha\nezha-agent.exe -c C:\nezha\config.yaml" -DisplayName "Nezha-Service" -StartupType Automatic

Status   Name               DisplayName
------   ----               -----------
Stopped  nezha-service      nezha-service


PS C:\nezha> Start-Service -Name "nezha-service"
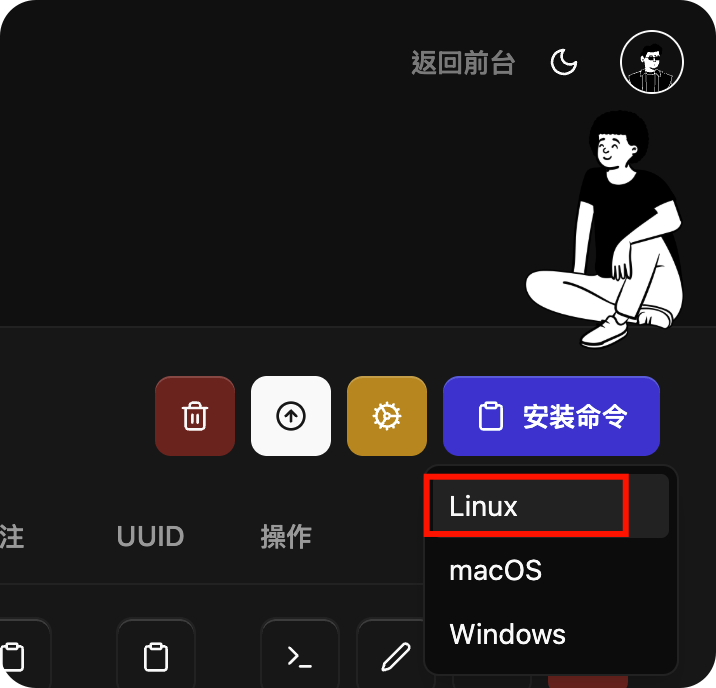
Linux部署
一键部署
登录后台,设置好相关参数(Agent对接地址【域名/IP:端口】),可以直接生成的安装连接
此处我隐去了关键的IP+Port、以及Secret Key信息,请按需恢复
azureuser@ubuntu20-workload-1:~$ curl -L https://raw.githubusercontent.com/nezhahq/scripts/main/agent/install.sh -o agent.sh && chmod +x agent.sh && env NZ_SERVER=<ip:port> NZ_TLS=false NZ_CLIENT_SECRET=<secret> ./agent.sh
 % Total    % Received % Xferd  Average Speed   Time    Time     Time  Current
                                Dload  Upload   Total   Spent    Left  Speed
100  4947  100  4947    0     0   230k      0 --:--:-- --:--:-- --:--:--  230k
Installing...
2025/02/11 15:15:49 Successfully executed action install!
nezha-agent successfully installed
azureuser@ubuntu20-workload-1:~$
手动安装
按照Linux的系统架构下载对应的Agent版本,并上传&解压到任意目录
root@iZuf6fp0fnsdjqewe13cbbZ:/data/nezha-agent# ls
config.yaml  nezha-agent
同样按照Windows的步骤,简单修改config.yaml文件,例如UUID和Server字段
最后通过systemd来设置守护进程
root@iZuf6fp0fnsdjqewe13cbbZ:/etc/systemd/system# cat nezha-agent.service
[Unit]
Description=Nezha Agent
After=network.target

[Service]
Type=simple
User=root
Group=root
ExecStart=/data/nezha-agent/nezha-agent -c /data/nezha-agent/config.yaml
Restart=always
RestartSec=5

[Install]
WantedBy=multi-user.target
root@iZuf6fp0fnsdjqewe13cbbZ:/etc/systemd/system# systemctl enable nezha-agent.service
Created symlink /etc/systemd/system/multi-user.target.wants/nezha-agent.service → /etc/systemd/system/nezha-agent.service.
sroot@iZuf6fp0fnsdjqewe13cbbZ:/etc/systemd/system# systemctl start nezha-agent.service
威联通NAS部署
先尝试使用Linux的一键脚本安装,由于NAS的文件系统修改过,失败
查询系统架构,使用对应的安装包
[~] # uname -m x86_64上传对应版本
rali@Raynors-MacBook-Pro ~ % scp ./Downloads/nezha-agent_linux_amd64.zip  admin@192.168.48.254:/opt/nezha
admin@192.168.48.254's password:
nezha-agent_linux_amd64.zip                                              100% 7107KB   5.2MB/s   00:01
rali@Raynors-MacBook-Pro ~ %
通过crontab设置守护进程
[~] # crontab -l | grep nezha
* * * * * /share/CACHEDEV5_DATA/ContainerStationFile/nezha-agent/nezha-agent_crash_monitor.sh
[~] # cat /share/CACHEDEV5_DATA/ContainerStationFile/nezha-agent/nezha-agent_crash_monitor.sh
#!/bin/bash

d=`date '+%F %T'`;
num=`ps fax | grep '/nezha-agent' | egrep -v 'grep|echo|rpm|moni|guard' | wc -l`;
echo $num;
if [ $num -lt 1 ];then
 echo "[$d] nezha-agent is dead...restarting" >> /share/CACHEDEV5_DATA/ContainerStationFile/nezha-agent/log.log ;
 echo "[$d] nezha-agent is dead...restarting";
 /share/CACHEDEV5_DATA/ContainerStationFile/nezha-agent/nezha-agent -c /share/CACHEDEV5_DATA/ContainerStationFile/nezha-agent/config.yml;
fi

[~] #
参考文档
https://blog.mitsea.com/e243ad2e577342098196568ed9df3a36/
TrueNAS Core
查看TrueNAS的系统架构
root@truenas[/opt/nezha]# uname -m
amd64
上传FreeBSD的对应agent版本
C:\Users\Admin\Downloads>scp nezha-agent_freebsd_amd64.zip root@192.168.52.52:~
root@192.168.52.52's password:
nezha-agent_freebsd_amd64.zip                                     100% 7001KB  35.7MB/s   00:00

C:\Users\Admin\Downloads>
解压并给予执行权限
root@truenas[/opt/nezha]# unzip nezha-agent_freebsd_amd64.zip
Archive:  nezha-agent_freebsd_amd64.zip
 extracting: nezha-agent
root@truenas[/opt/nezha]# ls
config.yml                      nezha-agent                     nezha-agent_freebsd_amd64.zip
root@truenas[/opt/nezha]# chmod +x nezha-agent
直接执行
root@truenas[/opt/nezha]# ./nezha-agent -c config.yml